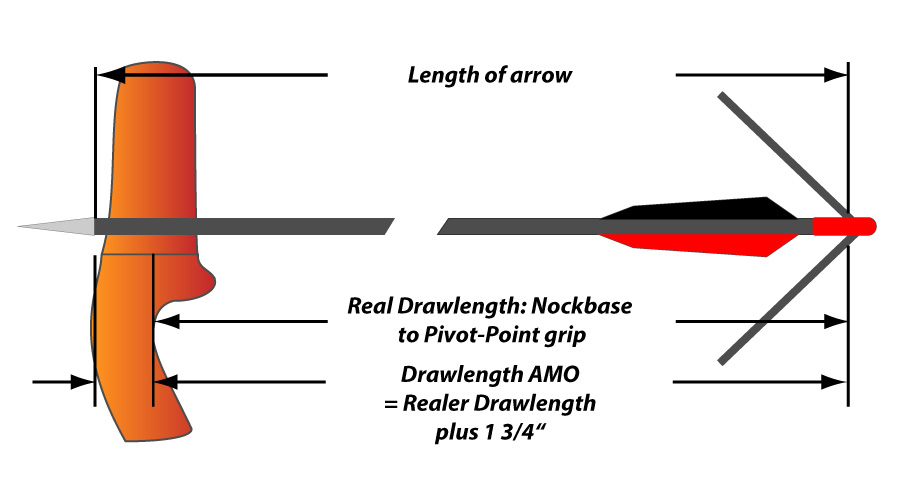
Real-Drawlength measurement for release- and finger-shooters:
As simple as possible with a (release)cord. Tie the cord at the nocking point, lay the open end between bowhand and grip. Pull the bow - let the bow down. Mark the point at the rope between hand and grip, measure it, done. That is the real drawlenght. To determine drawlength according AMO, please add 1.75".
For using an measurement-arrow, the trailing edge of the anterior Berger Hole is your reference for measuring.
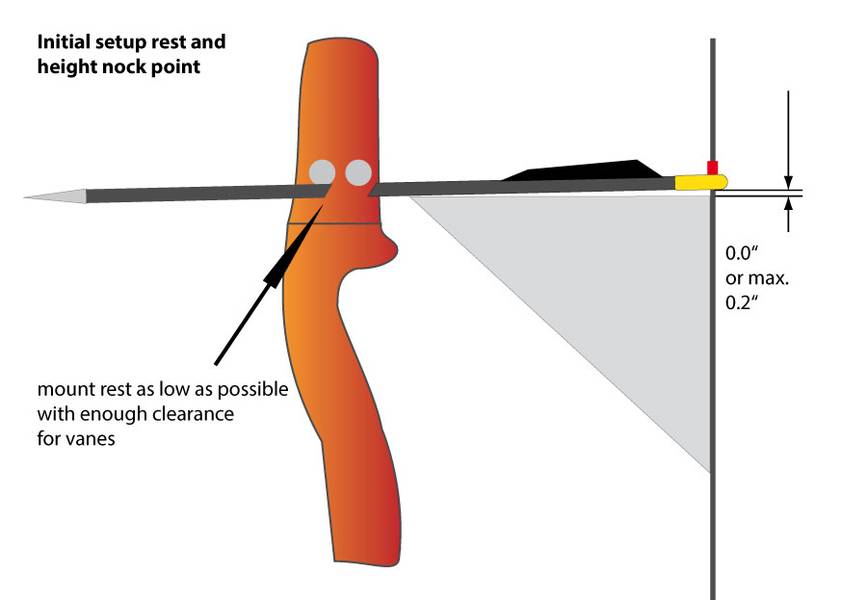
Here is a small guide for an initial setup. It is perfect for the OK Archery DST and ABSOLUTE, works with other brands too.
First: set the rest as low as you can! Look for enough clearance for the vanes. For the DST-bows the tipps of the launcher blade are 8,5mm above the lowest point of the shelf. We know, that is not usual, but so we are as near as possible to the crossing of the cables. Shooting an ABSOLUTE you can install the nock exactly between the two axles - if your rest is compatible with this setup. That is the sweet-spot of the bow where we have the best balance of power-input from upper and lower cam/limbs. Perfect cam-timing is a must.
Second: The nocking-point height! Fix a knot serving material at the string lightly. Nock your arrow on and take a geometric triangle. One side close to the string. The other should touch the shaft only at the end! Near the nock you should look through a 0.5 mm/0.2" line open between shaft and triangle. Move the serving so that the arrow is held at this position and tie in the upper nockpoint. Now put a nock on the string and tie in the bottom nockpoint, so that you can move the nock lightly ( 0,5mm/0.2" is the outer limit).
Third: Install your peepsight and tie in the D-Loop. If you are right handed archer, the upper loop-knot should leave to the left side. So you have less torque on the string while twisting the release at your anchorposition - some archers angle the release in their face, how do you?
Fourth: Set up the center with a laser tool or by eye-checking first. Prove it with shooting 2 Meter/3 Yards vs. 45 Meter/50 Yards or French Tuning.
This is about finetuning (Cam-Timing) 2-cam bows using"Creep-Tuning". Follow our guidelines please.
- As preparation, adjust the cam-timing turning the limb-bolts as exactly as possible. You can give more power to the lower limb - not really necessary (1/8 to 3/16 inch).
- Now, adjust your sight to 20 Yards.
- Mark a horizontal line with adhesive tape on the butt.
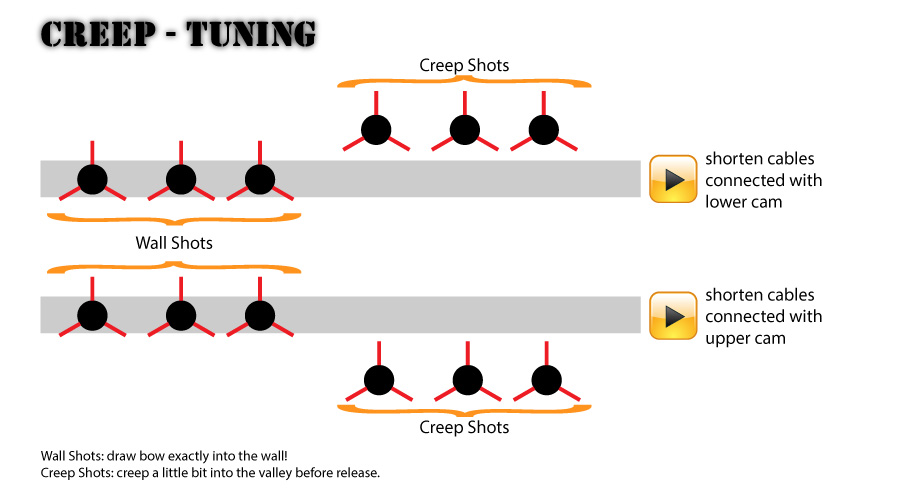
- Draw the bow hard into the wall - this is our reference. Shoot 4 or 5 arrows on the line. Let the arrows stick on the line!
- Now it becomes more difficult! Creep a little into the valley before you release the arrow and shoot 4 or 5 arrows on the line. Only "good shots" count. Eliminate bad shots or release mistakes.
- Is the bow adjusted perfectly, all shot are sticking on the line. All is perfect and nothing to change.
- What is to do, if the "Creep-Shots" hit above or underneath the tape?
NOTE: Twinsting in has a more progressive effect than untwisting. In other words, twisting in shortens more than untwisting extends the cable! - Hitting above the line:
Shorten the cables connected to the lower cam by twisting in.
Or extend the cable connected to the upper cam by twisting out. - Hitting underneath the line:
Shorten the cables connected to the upper cam by twisting in.
Or extend the cables connected to the lower cam by twisting out. - NOTE: Only small steps - half or one full twist. Note down your changes to record the way back. Shoot again 4 or 5 arrows to verify the changings.
- If you need a "Super-Fine-Tuning", repeat the procedure at 45 Yards.
NOTE:
It is even possible to time the cams in the field without a bow press. Press one cable towards the riser. This relaxes the other cable, you can now unhinge and twist it. Using a stable tension belt is more comfortable, you have both hands free.
It is even possible to time the cams in the field without a bow press. Press one cable towards the riser. This relaxes the other cable, you can now unhinge and twist it. Using a stable tension belt is more comfortable, you have both hands free.


